.svg)

.svg)
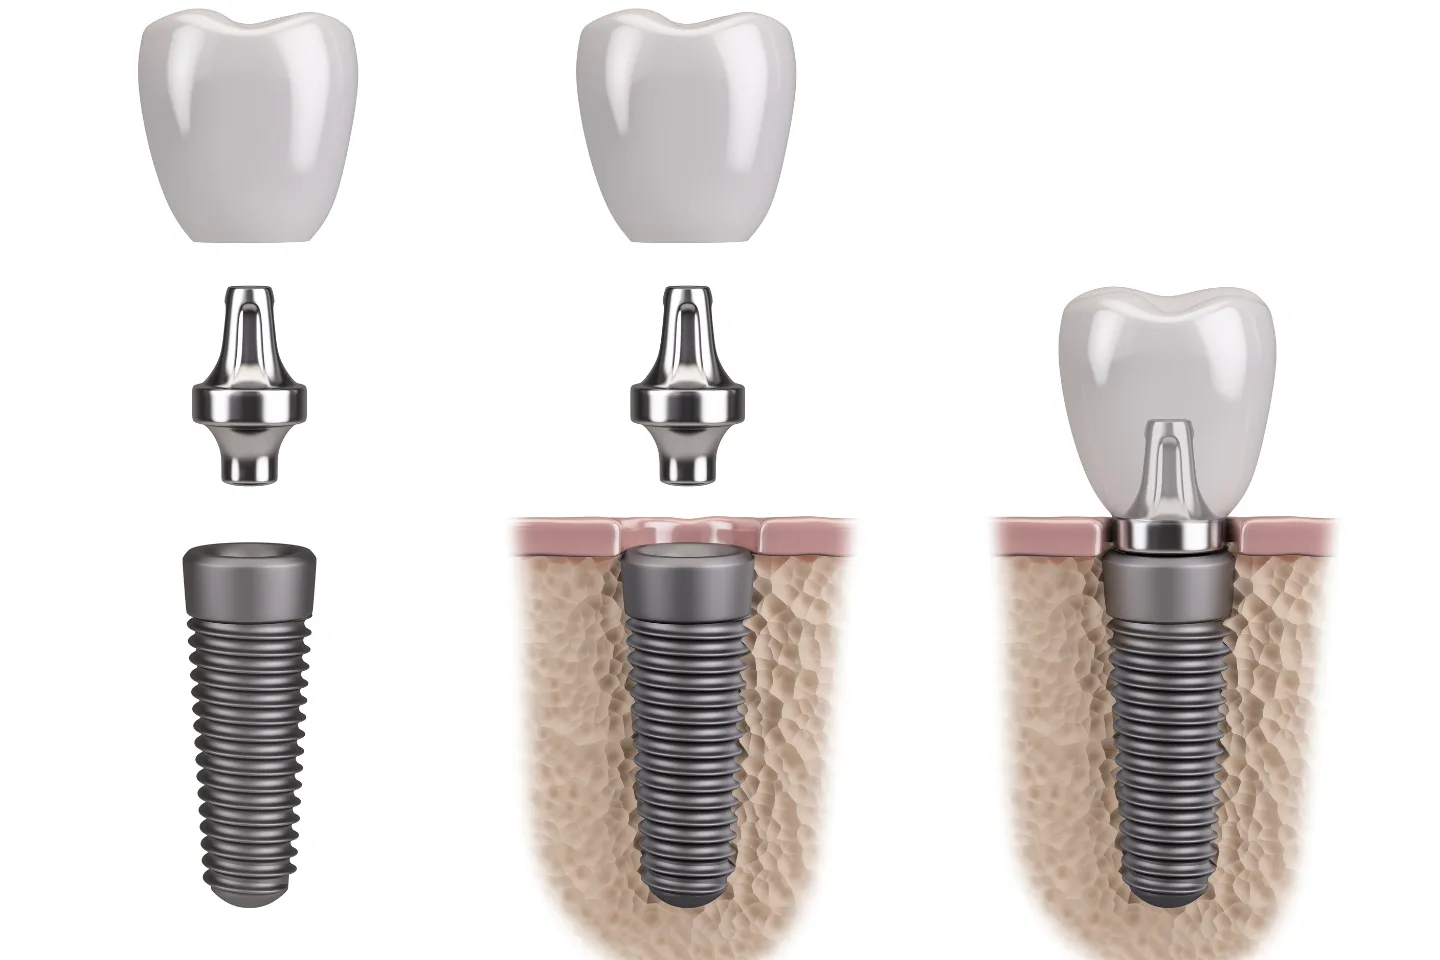
Losing a tooth can feel like losing a piece of yourself. It impacts the way you speak, turns your favorite meals into a mechanical chore, and can make you want to hide your smile during photos or social gatherings. If you are dealing with a missing tooth, you have likely heard that dental implants are the absolute gold standard for restoring your smile. Unlike traditional dentures or dental bridges that sit on top of your gums, implants replicate the entire structure of a natural tooth from root to crown.
However, because it is a multi-step journey that involves a surgical phase, the prospect of getting started can feel a bit intimidating. It is completely normal to have questions about what the timeline looks like, how much it hurts, and what exactly happens behind the scenes.
At Fremont Star Dental, we believe that transparency is the best cure for dental anxiety. The journey to a complete smile is a highly structured, predictable process that rewards your patience with a lifetime of stability. Let us take a compassionate, human look at the entire dental implant process step by step, so you know exactly what to expect when you partner with a premier dentist.
Step 1: The Comprehensive Initial Consultation
Every great transformation begins with a solid plan. Your journey starts with an in-depth consultation, which serves as the foundational blueprint for your entire treatment.
Advanced 3D Imaging and Diagnostics
During this visit, your dentist will not just glance inside your mouth with a mirror. A top cosmetic and restorative team will utilize cutting-edge technology like Cone Beam Computed Tomography (CBCT) scans. This specialized equipment creates a detailed 3D digital image of your jawbone, nerve pathways, and surrounding sinus cavities. This allows your provider to visualize your internal oral anatomy with microscopic precision.
Evaluating Bone Density and Gum Health
For an implant to be successful, it needs a thick, sturdy bed of jawbone tissue to anchor into. Your provider will evaluate the height and density of your bone. If you have been missing a tooth for a long time, the bone in that area may have naturally shrunk or resorbed.
If this is the case, do not worry! Your dentist can recommend a preliminary procedure known as a bone graft to rebuild the foundation. Your team will also thoroughly examine your mouth to ensure your gums are completely free of periodontal disease or bleeding gums, as a healthy soft tissue foundation is vital for proper healing.
Step 2: Preparatory Procedures (If Needed)
Not every patient requires this transitional stage, but for those who do, it ensures the long-term survival of your new tooth.
Tooth Extractions
If your missing tooth is actually a severely decayed or fractured tooth that cannot be saved by a root canal, your provider will need to safely extract it first. In many cases, a bone graft material can be placed directly into the empty socket immediately following the tooth extraction to preserve the bone structure for your future implant.
Bone Grafting and Sinus Lifts
If your 3D scans reveal that your jawbone is too thin or soft to hold an implant post securely, a bone graft will be performed. This involves placing specialized bone tissue material into the area to encourage your body to naturally generate new, strong bone. If you are replacing a missing upper back molar, a similar procedure called a sinus lift may be utilized to gently elevate the sinus floor and clear a thick pathway for the implant. If significant grafting is required, this layer may need a few months to heal before moving to the surgical stage.
Step 3: The Surgical Implant Placement
Once your foundation is officially cleared and ready, it is time for the primary surgical procedure. While the word "surgery" can sound frightening, the vast majority of patients are pleasantly surprised by how simple and comfortable this appointment actually is.
Keeping You Completely Comfortable
Before the procedure begins, your team will apply a local anesthetic to completely numb the treated tooth area and surrounding nerve pathways. For individuals who struggle with severe dental anxiety or phobia, dental sedation options can be utilized to help you remain perfectly relaxed and floating through the visit.
Placing the Titanium Post
Using a highly accurate surgical guide generated from your initial 3D digital scans, your dentist will make a small, precise incision in your gum tissue to expose the underlying jawbone. A small channel is carefully created, and a medical-grade titanium implant post is gently inserted. This post acts as your new, artificial tooth root. Once the post is securely in place, the gum tissue is closed over the site with tiny stitches, and you are ready to head home and rest.
Step 4: Osseointegration and Healing
This is the phase of the dental implant process where the real magic happens behind the scenes. It requires the most patience, but it is exactly what makes an implant completely unique compared to other restorations.
The Power of Bio-Fusion
Over the course of three to six months, your body goes to work in a process called osseointegration. Because titanium is an exceptionally biofriendly material, your living jawbone tissue recognizes the implant post and physically grows directly around it, fusing with it permanently.
Life During the Healing Phase
During this healing period, you will go about your normal daily life. The implant post remains hidden safely beneath your gumline, completely protected from the pressures of chewing. If the missing space is in a highly visible part of your smile, your dentist can easily provide a comfortable temporary tooth or cosmetic flipper to wear so you never have to worry about walking around with a gap.
Step 5: Attaching the Abutment
Once your dentist uses a digital X-ray to confirm that your implant post has successfully fused with your jawbone, you will return to the clinic for a quick, minimally invasive follow-up appointment.
Exposing the Anchor
Your provider will apply a local anesthetic to ensure you feel zero discomfort. A tiny incision is made in the gum tissue directly above the hidden implant post. The dentist will remove a small protective healing cap and replace it with a specialized connector piece called an abutment.
Shaping the Gums
The abutment is a small collar that extends slightly above your gumline, acting as the structural bridge that will connect your internal titanium root to your visible prosthetic tooth. A small collar is placed around the abutment to help guide your gum tissue to heal in a perfectly round, natural shape around the base of your future tooth. Your gums will typically need about two weeks to heal completely around this connector piece.
Step 6: The Final Reveal: Fabricating and Placing Your Custom Crown
You have reached the final milestone of your restorative transformation. Your mouth is healed, your foundation is rock solid, and your gums are perfectly shaped.
Digital Impressions
Your dentist will use an advanced intraoral scanner to capture precise 3D digital impressions of your mouth, your abutment, and the surrounding natural teeth. There are no messy, gooey impression trays required. These highly detailed digital scans are sent directly to a specialized dental laboratory. Master ceramists will use these blueprints to custom craft a gorgeous porcelain dental crown that matches the exact shade, contours, and translucent characteristics of your surrounding natural teeth.
Securing Your Permanent Smile
When your permanent crown arrives back at the office, you will sit down in the chair for the final time. Your dentist will remove the temporary protector, place your new porcelain crown over the abutment, and check your bite with meticulous care. Once the fit is completely flawless and you fall in love with the look in the mirror, the crown is permanently screwed or cemented into place. Your smile is officially whole again!
Reclaim Your Confident Smile: Contact Fremont Star Dental Today
Making the choice to restore your smile with a dental implant is one of the most life-changing investments you can make for your health, presentation, and long-term peace of mind. While the journey requires a few steps and a bit of patience, the reward is a beautiful, fully functional tooth that can easily last for the rest of your life.
At Fremont Star Dental, we are passionate about guiding you through every step of this transformation with a gentle touch, transparent communication, and top-tier clinical expertise. As a premier dentist in Fremont, CA, we design personalized treatment plans that prioritize your unique comfort, lifestyle goals, and budget. Contact us today to schedule your comprehensive implant consultation, and let us help you take the first step toward a radiant, confident future.
Frequently Asked Questions About the Implant Process
How long does the entire dental implant process take?
On average, the entire journey from your initial consultation to the placement of your final custom crown takes anywhere from three to six months. If your jawbone is incredibly healthy and dense, the timeline can be faster. However, if your mouth requires extensive preliminary extractions, bone grafting, or a sinus lift, the entire multi-step process can take closer to nine to twelve months. Your provider will give you a clear, personalized timeline during your first visit.
Does dental implant surgery hurt?
Because the surgical site is completely numbed with advanced local anesthesia, you will not feel any sharp pain or discomfort during the actual placement of the titanium post. Most patients report that the sensation feels like a light vibration or mild pressure. Once the numbing wears off over the next few hours, you may experience some minor swelling, bruising, or tenderness in your jaw for three to five days, which can easily be managed with over-the-counter pain relievers.
How do I clean and maintain my dental implant?
Caring for a fully healed dental implant is remarkably easy because it behaves exactly like a natural tooth. You do not need any special soaking solutions or complicated floss threaders. Simply brush your teeth twice a day with a soft-bristle brush, floss daily between the teeth, and visit your dentist for your regular six-month professional dental cleanings and exams. While the porcelain crown cannot develop cavities, keeping your surrounding gums healthy is crucial to prevent early bone loss.
Am I too old to get a dental implant?
Absolutely not. When it comes to dental implant eligibility, your overall systemic health and the structural quality of your jawbone matter far more than the number on your birthday cake. As long as your body heals well, your medical conditions are fully managed, and your mouth is free of active gum disease, patients can successfully receive implants well into their eighties and nineties, completely restoring their ability to chew and smile with absolute freedom.
How long do dental implants last?
With proper care and regular dental checkups, the titanium implant itself can last for decades and potentially a lifetime. The crown attached to the implant may eventually need to be replaced due to normal wear, but maintaining good oral hygiene and protecting your bite can help maximize the lifespan of both the implant and restoration.
Can I eat normally after getting a dental implant?
You will need to follow a soft-food diet for a short period after implant surgery while the treatment area heals. Your dentist will provide specific instructions based on your procedure. Once the implant has fully integrated with your jawbone and the permanent crown has been placed, you can generally eat and chew normally, just as you would with a natural tooth.
What happens if I do not have enough bone for a dental implant?
If your jawbone does not have enough volume or density to securely support an implant, your dentist may recommend bone grafting before implant placement. A sinus lift may also be recommended for some patients who need an implant in the upper back jaw. These procedures help create a stronger foundation for long-term implant stability.
Can I get a dental implant immediately after a tooth extraction?
In some cases, an implant can be placed immediately after a tooth is extracted, particularly when there is sufficient healthy bone and no active infection. Other patients may need to wait for the extraction site to heal or undergo bone grafting before implant placement. Your dentist will use imaging and an examination to determine which approach is safest and most appropriate for you.